Ingenious Makers P11 – ESPHome Panasonic Climate Interface
Table of Contents
Getting the Panasonic Climate control off the cloud
Back in August 2021, we published an article about an ESPHome component for an ESP32 or ESP8266-based air conditioning/climate WiFi interface—a great way to get your Panasonic Climate Control off the Panasonic Comfort Cloud and into Home Assistant locally. The only thing missing was a proper hardware solution, so we developed one and published our initial design in our blog-article here.
Our SMD design perfectly replaced the original Panasonic Climate interface and even fitted the original enclosure. The only disadvantage was that an SMD design is extremely hard to build yourself. We received a lot of requests to sell a pre-built interface, which were soon sent all over the planet, costing us loads of time. That is not what we are about. We want to design hardware that you can easily build yourself, so we published our DIY version of the Panasonic Climate Interface.
The original design was based on the ESP32-C3 Mini module (Wemos D1 Mini sized), which is no longer broadly available. Our new design is based on the widely available ESP32-C3 Super Mini, which is even more compact and works just the same.
How does it work?
Panasonic Climate units are typically connected to Panasonic’s Comfort Cloud using either a DNSK-P11 or a CZ-TACG1 WiFi interface.
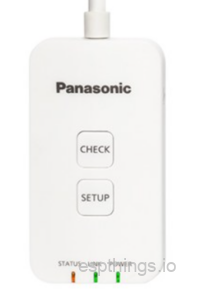 CZ-TACG1 |
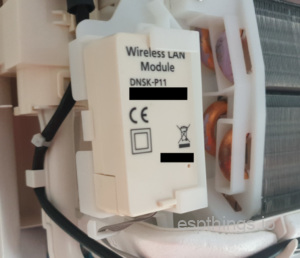 DNSK-P11 |
If you have one of these interfaces installed, you may find yourself dealing with the frustrations of using the Panasonic Cloud service. This often involves repeatedly logging in to your app and being unable to control your Climate unit due to cloud service outages. If you do not have one of these interfaces installed, you are likely limited to controlling your Climate unit with only the standard remote control that comes with it.
The Solution
Fortunately, there is a solution to these problems. A custom ESPHome component allows you to connect Home Assistant to your Panasonic Climate locally. With this setup, remote controlling your Climate unit becomes instant and independent of the cloud. Now, the only thing needed is some hardware to act as the bridge between Home Assistant and the Panasonic Climate.
Design parameters
Our requirements:
- Must be able to connect to both the CN-CNT and the DNSK-P11 connector
Must work as a DNSK-P11 or CZ-TACG1 replacement - Preferably have the same size as the original interface
- Must support an external DS18B20 temperature sensor
- Must have a USB-C terminal for esphome installation
- Enclosure must be readily available or 3D printable
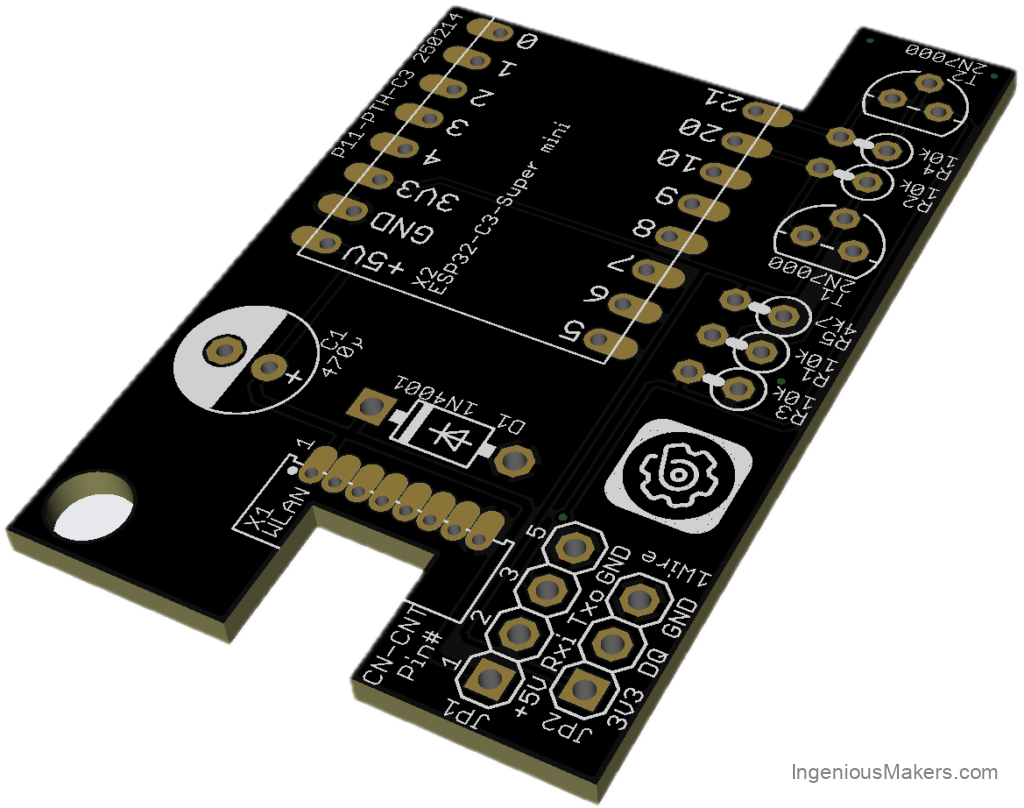
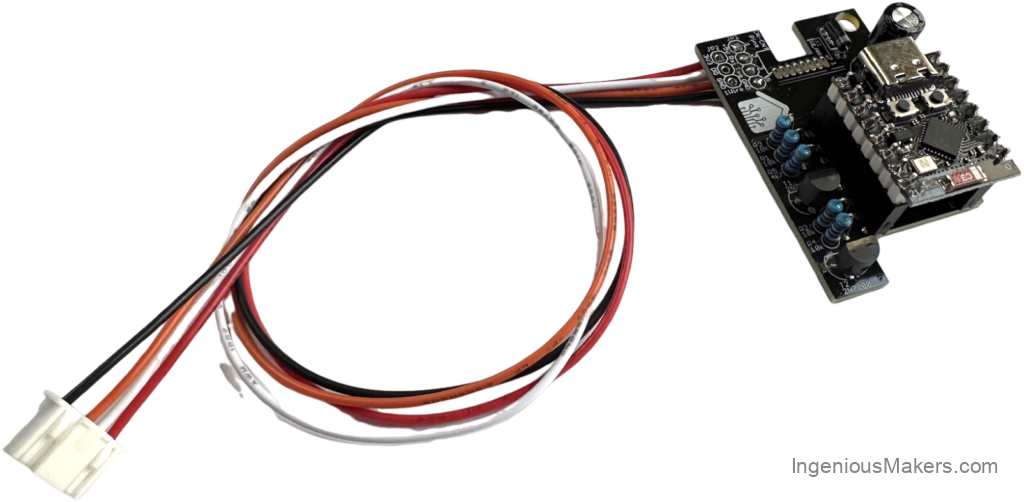
So we designed a PCB for a ESP32-C3 Super Mini module.
PCB design
We where able to come up with a simple yet effective design using only 9 simple components. Add the ESP32-C3 Super Mini and a connector and you have yourself a working Panasonic Climate Interface for Home Assistant.
PCB
Bill of materials
See below the list with the components you will need to build the Ingenious Makers P11 controller. A number of these items will not be sold in smaller quantities at AliExpress. We will try to use the same components as much as possible in other projects.
We would really appreciate it if you will use the links below to buy the components, since it will give a little bit of commission to us without any additional cost for yourself. These commissions will be used to cover some of the costs involved in the development of the design.
| Reference | Quantity | Description | Affiliate |
| ESP32-C3 Super Mini | 1 |
ESP32-C3 Super Mini |
Link |
| T1, T2 | 2 | 2N7000 TO92 Small Signal MOSFET 200 mAmps, 60 Volts | Link |
| D1 | 1 | 1N4001 | Link |
| C1 | 1 | 470µF / 10V or 16V 6mm diameter, 2.54mm pitch | Link |
| R1, R2, R3, R4 | 4 | Resistor 10KΩ | Link |
| R5 | 1 | Resistor 4.7KΩ | Link |
| JP1 | 1 | 5 pin PAP-05V-S connector with wires (cut duponts and solder!) Only needed for CZ-TACG1 |
Link |
| JP2 | 1 | Optional: Wired DS18B20 temperature sensor | Link |
| Enclosure | 1 | 3d-Printable Enclosure, specifically for this interface | Link |
| X1 | 5 | 1.27mm pin header Only needed for DNSK-P11 |
Link |
| PCB | 1 | PCB ET-P1101 from PCBway | Link |
Putting it together
| DISCLAIMER: We are frequently receiving questions from commercial hardware stores about our designs. How to build, which component or connector to use etc. We are all about DIY. If you can not build this module yourself using our instructions and some basic knowledge, please do not acquire them from commercial hardware stores, but abandon this project all-together. If you are however building this yourself and you have any further questions, you may post those in the comments and we will do our best to answer those in due time. |
Like with all other projects, it is the easiest to start with identifying the components purchased as discussed in our soldering blog post. After sorting the components and cleaning the PCB, start with the lowest components first. For this project, we advise to work in this order:
- DNSK-P11 header* (not required if you are attaching it to the CN-CNT to replace a CZ-TACG1 Wifi module)
- Diode
- MOSFETs
- Resistors
- Electrolytic capacitor
- ESP module headers (Use the hints in the soldering blog post!)
- CZ-TACG1 cable (only If you are attaching it to CN-CNT connector)
* Use a very small soldering tip for the 1.27mm headers and use minimal amount of soldering wire. Make sure it melts and flows out sufficiently.
Once all components are soldered in place, perform a good visual check of all joints, and pay particular attention to possible solder bridges (unwanted solder connections between pins). Do not forget to clean the excess solder flux from the PCB using alcohol!
Wiring
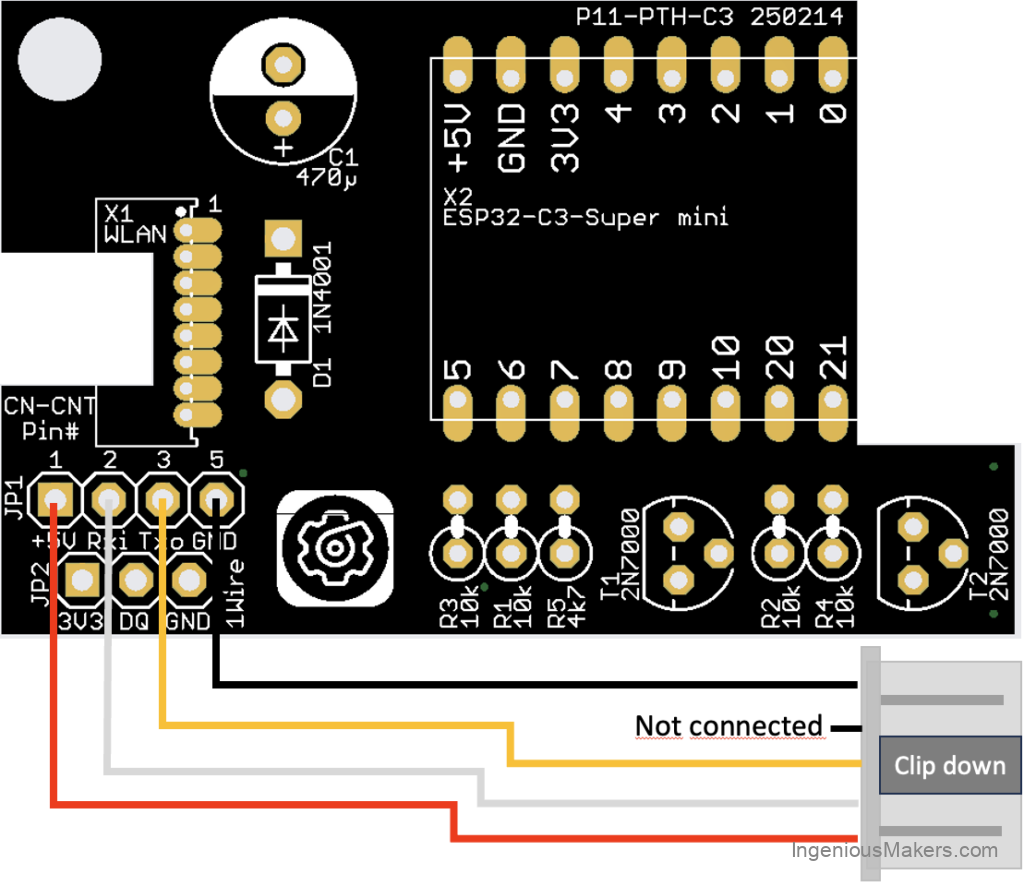
Finished module
Either solder the DNSK-P11 header or the CN-CNT cable. You only need one of both, depending on your climate unit!
Installation
DNSK-P11 replacement:

Original DNSK-P11 enclosure
Below a video on how to install the original CZ-TACG1 interface. The interface is different, but you’ll find clear instructions on how to open and close the unit. After taking off the enclosure, check your Climate unit for the DNSK-P11 enclosure.

Please subscribe to our YouTube channel and hit the bell, comment etc.to support us!
Take the DNSK-P11 pcb out of the enclosure carefully, remove the black connector from the PCB and install your Ingenious Makers P11 interface. Connect the interface using the original DNSK-P11 cable. The connector-lip needs to go downwards in the notch of the PCB, the flat part of the connector up.
Please be careful as the pins are tiny. If you use your brain in stead of brute force, you’ll be ok. 🙂
CZ-TACG1 replacement:
You can either replace the original CZ-TACG1interface, or if you have no Wifi interface installed yet and your Panasonic unit has the 5-pin CN-CNT connector, you are good to install the Ingenious Makers Wifi interface.

CN-CNT connector
Below a video on how to install the original CZ-TACG1 interface. The installation of the P11 interface with the cable (option 5), is pretty straight forward.
Please subscribe to our YouTube channel and hit the bell, comment etc.to support us!
Software
esphome config
Create a new esphome device and use the following configuration example:
substitutions:
  devicename: esp32-airco-01
  long_devicename: Panasonic Climate Office
  pcb_version: "P11-PTH-C3 250214"

esphome:
  name: "${devicename}"
  name_add_mac_suffix: false
  comment: "${long_devicename} ${pcb_version}"

esp32:
  board: esp32-c3-devkitm-1
  framework:
    type: esp-idf
  variant: ESP32C3

external_components:
  source: github://DomiStyle/esphome-panasonic-ac
  components: [panasonic_ac]

wifi:
  ssid: !secret esphome_wifi_ssid
  password: !secret esphome_wifi_password
  ap:
    ssid: "${devicename} Hotspot"
    password: !secret esphome_ap_password

captive_portal:

web_server:
  port: 80

logger:
  level: DEBUG

api:
  encryption:
    key: !secret esphome_api_key

ota:
  - platform: esphome
    password: !secret ota_password

bluetooth_proxy:

uart:
  tx_pin: GPIO21
  rx_pin: GPIO20
  id: ac_uart
  baud_rate: 9600
  parity: EVEN

switch:
  - platform: restart
    name: "$long_devicename Restart"

climate:
  - platform: panasonic_ac
    id: office
    type: cnt
    name: "$long_devicename"
    vertical_swing_select:
      name: "$long_devicename Vertical Swing Mode"
    outside_temperature:
      name: "$long_devicename Outside Temperature"
    current_power_consumption:
      id: power_consumption_office
      name: "$long_devicename Power Consumption"
      unit_of_measurement: W
      accuracy_decimals: 0
      device_class: power
      state_class: measurement

sensor:
  - platform: total_daily_energy
    name: "$long_devicename Total Daily Energy"
    power_id: power_consumption_office
    filters:
        - multiply: 0.001
    unit_of_measurement: kWh
    device_class: energy

time:
  - platform: homeassistant
    id: my_time
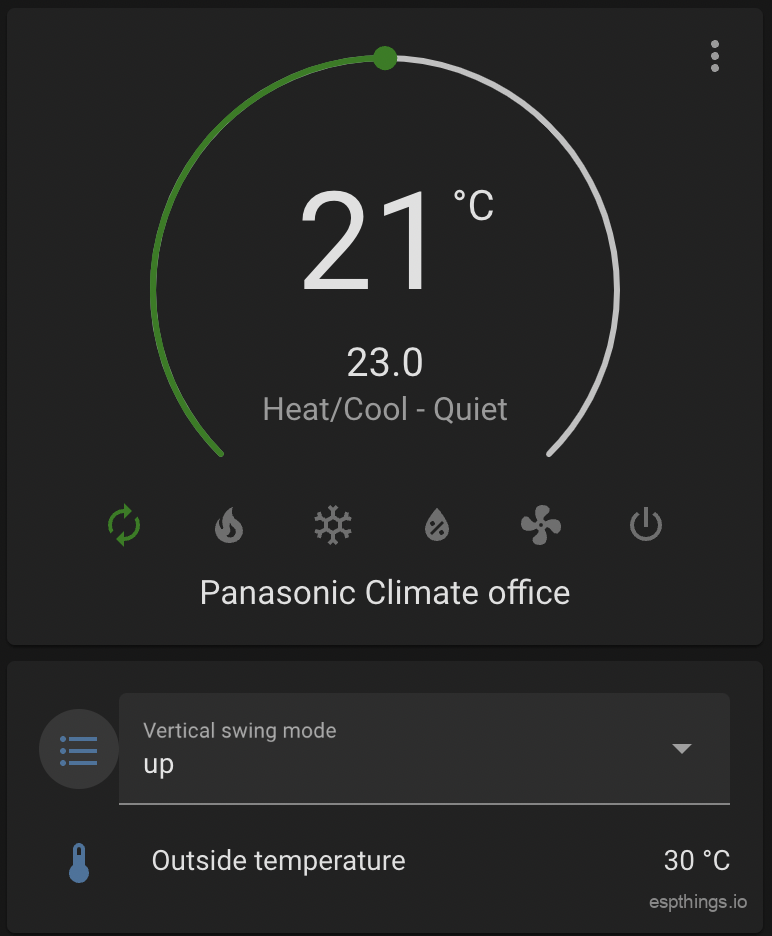
End result 🙂
Please subscribe to our newsletter!
Are you able to highlight the changes in this version compared to
https://www.ingeniousmakers.com/index.php/2023/09/02/esphome-panasonic-climate-interface/
and also the reasons for the update.
Thanks
Changed ESP32-C3 mini (wemos d1 style) to ESP32-C3 Super Mini
Moved 2 pins: Rx (from AC to esp) to pin 20, tx (from esp to ac) to pin 21
Moved the diode to accommodate for more space.
Hi, great work on this. Can I just clarify the use of the optional temperature sensor please? If the temperature sensor is installed, does it replace the existing internal temperature sensor of the unit?
No it does not. That is sadly not possible.
Thanks for the fast reply. What does it do then – just show up as another sensor in esphome?
Not much. It was a requested feature.
You could use it as a accurate temperature sensor (since the climate is mostly incorrect) and then use Home Assistant to correctly heat and cool the room using automations.
Also have a look at https://github.com/DomiStyle/esphome-panasonic-ac/issues/136
I included the optional temp sensor on JP2. However, it does not seem to be exposed as a sensor in Home Assistant.
Can you elaborate on how we get this working?
Looking at the *old* project, I see the following in the esphome configuration:
Is this still valid for this new version?
how can i use the one wire temp sensor? what needs to be added to the code? that the thermostat in homeassistant the one wire temp is showing. I can’t manage to show the temp.
Thanks
I am also wondering that, maybe update the example with all functions possible, just commented out?
Does the P11 work for Panasonic Aquarea monoblock? Or do they use another protocol?
Hi, I flash ESP32-C3 Super Mini but if I try to connect to its AP it disconnects and reconnects continuously.
It seems that when it scans for wifi its AP keeps disappearing and reappearing
Take the esp32-c3 off our pcb and test it separately using a USB cable attached to a power brick.
If the wifi is bad, you might have a bad esp32-c3 module with a faulty antenna design.
I removed ESP32-C3 Super Mini from the PCB but I have the same problem with the AP connection, if I connect ESP32-C3 Super Mini to the existing wifi it connects and I reach the web page
It could be esphome related. It does not seem to be related to this project.
I made this modification of the wifi antenna:
https://peterneufeld.wordpress.com/2025/03/04/esp32-c3-supermini-antenna-modification/
I added in the yaml file:
wifi:
power_save_mode: none
output_power: 8.5
I also disabled bluetooth in the yaml file:
#bluetooth_proxy:
now AP works well and the connection signal is also good,
I still have to solder the 2 Mosfets 2N7000 TO92 then I try to connect the interface via CZ-TACG1
I added this:
wifi:
power_save_mode: none
output_power: 8.5
I disabled bluetooth:
#bluetooth_proxy:
I modified the antenna following this guide:
https://peterneufeld.wordpress.com/2025/03/04/esp32-c3-supermini-antenna-modification/
Now in wifi AC mode it works perfectly and does not deactivate, even connected to wifi it works well with a good signal.
I connected the interface on a ducted system CS-E18RD3EAW indoor unit from 2017 and it works perfectly
I’ve built and connected one to my AC head unit, but it seems to be unable to establish a connection via the cnt port, always reporting NA or NaN for every value and nothing happens if I change the state via the web interface.
I’ve checked all the solder joints and everything seems to be alright from the pin on the ESP all the way through to the connector, is there any other troubleshooting I can do to try and identify where the issue is? There was no CZ-TACG1 connected before, is it possible there is something with the header unit itself that isn’t set appropriately?
I seem to be having the same problem.
Also, everything on the HomeAssistant side says everything is good and connected.
But the device doesn’t show up on my network router. But I can go to the IP address of the module and the interface comes up. Still doesn’t do anything
Would really appreciate any thoughts on this
Does anyone know if this works with the new WiFi modules (PIOT-V2(WA)). I’m considering a Panasonic Etherea system and it’s likely the indoor units will be fitted with those new modules.
I have two Climasystems with Indoor CS-Z25VKEW and Outdoor CU-Z25VKE.
The Cloud Inferface Works Not very for with Home Assistent.
I have last become an error and in Home Assistant, I have no Information about the errorcode. In the App Comfort Cloud have a become an Error H97 with representing Text to the error.
Can your Interface also give out error?
Hi! I am struggeling a bit with the CN-CNT connections as the colors dont match with the cables and the schematics. Is there anyone that have a photo of the cable connected with the clip showing so i can trace the wires correctly. I am struggeling with the «direction» og the clip up/down as it seems to not match the picture and the drawing
Hi! Is it just me, or does it seem like the onewire sensor is missing a trace to one of the GPIO pins? i cant seem to find it on the PCB, it worked when i installed a botch wire between the DQ and GPIO4 on the board.
I think also the same.
I have find out, the DQ Pin is direct connected to resistor with 4,7k and the other side of resistore is connected to 3,3v. The DQ and first side of resistore, I guest is to connect to and gpio pin. This I miss. So we have the same detection.
First, thanks for the project.
I have some ideas for changes. I have the Panasonic CS-Z25VKEW indoor device.
Following:
Give are one Wire devices for Voltage, Power and current measurement like an shelly? Or other sensors with one wire bus?
Can you send me the complete design files and witch software you use? So i can self update the plan. Thanks.
Hello Michel,
Hello Community,
has anyone this version of pcb run with external one_wire sensors?
I have tryed out, the one_wire Sensor runs on other esp.
In this pcb on jp2 i have tryed, but not working. Possible problem with configuration. With GPIO must i use? i have any tried, but no one has work.
I have also showing on pcb and i was confused. The DQ pin is connected to resister with 4,7Kohm. the one side of resister goes to 3,3V and the other side only to jp2 DQ. I think here is a bug in the pcb. Is this right?
Can you send me please an schematic and project files for the pcb. The Gerber files in the online viewer are difficult to verify.
Thanks,
Sascha (svalcken), svalcken@icloud.com
Is there a possibility to use http commands to control the airconditioning?
I also try to figure out how to use the mqtt but is there someone who can help me with this? I can not find information about the use of MQTT with this module.
Thanks
Hi, the post is a bit unclear about the DNSK-P11 interface:
In this post there are no images of the soldered header which would be helpful.
The old blog post at https://www.ingeniousmakers.com/index.php/2021/08/03/panasonic-climate-wifi-interface-for-esphome-and-home-assistant/#Panasonic_DNSK-P11_replacement
shows several imaged of the soldered P11 connector, how the wire connects and how the PCB is placed in the box. I highly suggest including some of those pictures in this blog-post as well.
Thanks!
10Pcs 1.27mm 2.0mm 2.54mm Pitch 1x2P -50Pin Single Row Male Female Pin Header PCB Board Connector 1.27 Pin header Socket SMD SMT
Color: Male Bent needle, 2×8 Pin
This is what I bought^
LAST UPDATE:
INFO ESPHome 2025.7.5
INFO Reading configuration /config/esphome/panas-climate-studio.yaml…
WARNING GPIO12 is a strapping PIN and should only be used for I/O with care.
Attaching external pullup/down resistors to strapping pins can cause unexpected failures.
See https://esphome.io/guides/faq.html#why-am-i-getting-a-warning-about-strapping-pins
INFO Generating C++ source…
INFO Compiling app..
Do you think something needs to be done or can you ignore it?
Hi
First of all, thanks, Michel, for writing all this and putting this together!
I ordered PCB, components, and am ready to solder them.
(Btw, links from the post point to different variations of some items instead of those that were needed).
There is still one problem I can’t figure out.
I have a Panasonic Ducted AC S-100PF1E5A with an A747938 PCB board. It is a semi-professional or professional series (who cares) and doesn’t have a CN-CNT connector.
The only ones closest to what I think might be the port I need are either CN060 OPTION or CN061 T10 (?). But there is literally zero information on the internet about the pinout.
I can safely assume (and confirm with a multimeter) +5 and GND, but I have no idea how to find data pins.
Does anyone have luck with Panasonic PACi?
Thanks
I am wondering why my comment was deleted? Did I say something wrong?
I tried to make it working with PACi that installed in my apartment and I just needed some help.
Well.
Hi
I ordered PCB, components, and am ready to solder them.
Btw, links from the post point to different variations of some items instead of those that were needed.
There is still one problem I can’t figure out.
I have a Panasonic Ducted AC S-100PF1E5A with an A747938 PCB board. It is a semi-professional or professional series (who cares) and doesn’t have a CN-CNT connector.
The only ones closest to what I think might be the port I need are either CN060 OPTION or CN061 T10 (?). But there is literally zero information on the internet about the pinout. I can safely asume (and confirm with multimeter) +5 and GND, but I have no idea how to find data pins.
Does anyone have luck with Panasonic PACi?
I have the same motherboard, were you able to solve it?
I suspect that the wireless module that works with your AC unit is actually a CZ-CAPWFC1. If you look that up you should be able to find the correct communication terminals that you need to use, however, as it is a different module I don’t know if this interface will work. Please keep us updated though, I have an AC unit that I would like to do the same to but I have only just started looking into this.
Hi, did you continue with this?
Hi
There are basically two options.
I didn’t find good reliable solution with ESP32, or similar
There is also another class of devices from IntesisHome that may help
That’s it
It’s Panasonic
Thanks for this great solution.
I successfully implemented it with 3x CS-Z42XKEW indoor units with CZ-TACG1 connection.
For this, I used an ESP32-C6 Super-Mini and connected the 5-pin PAP adapter directly to the ESP32.
The 5-pin PAP adapter now has different colors than in your wiring schematic: black = 5V, orange = GND, white = TX, red = RX.
Not all PAP connector have the same wiring colors, mine are also different to the specified photo. Maybe a photo of your board and PAP showing connection would help.
Hi,
I have been using this integration now for some years and it works great.
However, in a recent update of ESPhome, the LED on the ESP32-C3mini is constantly on. Since the airco is in the bedroom, it give a little annoying light at night. I am trying to turn this off by adding code in yaml, but it is not responding when toggling the switch in ESPhome/HA.
This is the code i used which is not working:
output:
– platform: gpio
pin: 8
id: onboard_led
switch:
– platform: restart
name: “$long_devicename Restart”
– platform: output
output: onboard_led
id: onboard_led_switch
name: “ESP32-C3 Onboard LED”
restore_mode: ALWAYS_OFF # Ensures LED is off after every boot
anyone has an idea how to switch off the led?
Hi,
I got rid of this light by taking off the mains of the unit for few minutes.
Hi. Did taking off the mains worked permanently? I have the same behaviour, but eventually the led powers on again for unknown reason….
I have three units are running reliably over the CNT interface.
I recently added three new models (CS-RU12YKA / CS-RU18YKA / CS-RU24YKA) that don’t have a CNT port. DNSK-P11 initially had unreliable handshakes, so I captured UART traffic from the original Panasonic Wi-Fi controller and revised the comms logic in a fork of DomiStyle’s project. With these changes, DNSK-P11 is now working smoothly. The interfaces are also now compatible with upcoming ESPHome updates.
Repository: https://github.com/beebop5/esphome-panasonic-ac. If you have success with other models, please let me know the model number so I can update the documentation.
Unfortunately there were too many changes for a clean upstream merge so this will remain a fork.
Hi, Duncan.
During installation to the ESP, I got some warnings related to outdating some programming features and some code failures. What am I doing wrong? Your help is very appreciated.
Here’s the log:
INFO ESPHome 2025.11.4
INFO Reading configuration /config/esphome/beebob-1.yaml…
INFO Detected timezone ‘Europe/Berlin’
INFO Generating C++ source…
INFO Compiling app… Build path: /data/build/test1-ac
Processing test1-ac (board: esp32-c6-devkitm-1; framework: espidf; platform: https://github.com/pioarduino/platform-espressif32/releases/download/55.03.31-2/platform-espressif32.zip)
——————————————————————————–
INFO Package configuration completed successfully
Library Manager: Installing esphome/noise-c @ 0.1.10
INFO Installing esphome/noise-c @ 0.1.10
Unpacking [####################################] 100%
Library Manager: noise-c@0.1.10 has been installed!
INFO noise-c@0.1.10 has been installed!
Library Manager: Resolving dependencies…
INFO Resolving dependencies…
Library Manager: Installing esphome/libsodium @ 1.10020.7
INFO Installing esphome/libsodium @ 1.10020.7
Unpacking [####################################] 100%
Library Manager: libsodium@1.10020.7 has been installed!
INFO libsodium@1.10020.7 has been installed!
INFO Package configuration completed successfully
HARDWARE: ESP32C6 160MHz, 320KB RAM, 4MB Flash
– contrib-piohome @ 3.4.4
– framework-espidf @ 3.50501.0 (5.5.1)
– tool-cmake @ 4.0.3
– tool-esp-rom-elfs @ 2024.10.11
– tool-esptoolpy @ 5.1.0
– tool-mklittlefs @ 3.2.0
– tool-ninja @ 1.13.1
– tool-scons @ 4.40801.0 (4.8.1)
– toolchain-riscv32-esp @ 14.2.0+20241119
Reading CMake configuration…
Generating assembly for certificate bundle…
Dependency Graph
|– noise-c @ 0.1.10
Compiling .pioenvs/test1-ac/src/esphome/components/api/api_connection.cpp.o
Compiling .pioenvs/test1-ac/src/esphome/components/api/api_frame_helper.cpp.o
Compiling .pioenvs/test1-ac/src/esphome/components/api/api_frame_helper_noise.cpp.o
Compiling .pioenvs/test1-ac/src/esphome/components/api/api_pb2.cpp.o
Compiling .pioenvs/test1-ac/src/esphome/components/api/api_pb2_service.cpp.o
Compiling .pioenvs/test1-ac/src/esphome/components/api/api_server.cpp.o
Compiling .pioenvs/test1-ac/src/esphome/components/api/list_entities.cpp.o
Compiling .pioenvs/test1-ac/src/esphome/components/api/proto.cpp.o
Compiling .pioenvs/test1-ac/src/esphome/components/api/subscribe_state.cpp.o
Compiling .pioenvs/test1-ac/src/esphome/components/climate/climate.cpp.o
Compiling .pioenvs/test1-ac/src/esphome/components/climate/climate_mode.cpp.o
Compiling .pioenvs/test1-ac/src/esphome/components/climate/climate_traits.cpp.o
Compiling .pioenvs/test1-ac/src/esphome/components/esp32/core.cpp.o
Compiling .pioenvs/test1-ac/src/esphome/components/esp32/gpio.cpp.o
Compiling .pioenvs/test1-ac/src/esphome/components/esp32/helpers.cpp.o
Compiling .pioenvs/test1-ac/src/esphome/components/esp32/preferences.cpp.o
Compiling .pioenvs/test1-ac/src/esphome/components/esphome/ota/ota_esphome.cpp.o
Compiling .pioenvs/test1-ac/src/esphome/components/logger/logger.cpp.o
Compiling .pioenvs/test1-ac/src/esphome/components/logger/logger_esp32.cpp.o
Compiling .pioenvs/test1-ac/src/esphome/components/logger/task_log_buffer.cpp.o
Compiling .pioenvs/test1-ac/src/esphome/components/md5/md5.cpp.o
Compiling .pioenvs/test1-ac/src/esphome/components/mdns/mdns_component.cpp.o
Compiling .pioenvs/test1-ac/src/esphome/components/mdns/mdns_esp32.cpp.o
Compiling .pioenvs/test1-ac/src/esphome/components/network/util.cpp.o
Compiling .pioenvs/test1-ac/src/esphome/components/ota/ota_backend.cpp.o
Compiling .pioenvs/test1-ac/src/esphome/components/ota/ota_backend_esp_idf.cpp.o
Compiling .pioenvs/test1-ac/src/esphome/components/panasonic_ac/panasonic_ac_base.cpp.o
Compiling .pioenvs/test1-ac/src/esphome/components/panasonic_ac/panasonic_ac_component.cpp.o
src/esphome/components/panasonic_ac/panasonic_ac_base.cpp: In member function ‘virtual esphome::climate::ClimateTraits esphome::panasonic_ac::PanasonicACBase::traits()’:
src/esphome/components/panasonic_ac/panasonic_ac_base.cpp:13:29: warning: ‘void esphome::climate::ClimateTraits::set_supports_action(bool)’ is deprecated: This method is deprecated, use add_feature_flags() instead [-Wdeprecated-declarations]
13 | traits.set_supports_action(false);
| ~~~~~~~~~~~~~~~~~~~~~~~~~~^~~~~~~
In file included from src/esphome/components/climate/climate.h:9,
from src/esphome/components/panasonic_ac/panasonic_ac_base.h:3,
from src/esphome/components/panasonic_ac/panasonic_ac_base.cpp:1:
src/esphome/components/climate/climate_traits.h:130:8: note: declared here
130 | void set_supports_action(bool supports_action) {
| ^~~~~~~~~~~~~~~~~~~
src/esphome/components/panasonic_ac/panasonic_ac_base.cpp:15:42: warning: ‘void esphome::climate::ClimateTraits::set_supports_current_temperature(bool)’ is deprecated: This method is deprecated, use add_feature_flags() instead [-Wdeprecated-declarations]
15 | traits.set_supports_current_temperature(true);
| ~~~~~~~~~~~~~~~~~~~~~~~~~~~~~~~~~~~~~~~^~~~~~
src/esphome/components/climate/climate_traits.h:86:8: note: declared here
86 | void set_supports_current_temperature(bool supports_current_temperature) {
| ^~~~~~~~~~~~~~~~~~~~~~~~~~~~~~~~
src/esphome/components/panasonic_ac/panasonic_ac_base.cpp:16:51: warning: ‘void esphome::climate::ClimateTraits::set_supports_two_point_target_temperature(bool)’ is deprecated: This method is deprecated, use add_feature_flags() instead [-Wdeprecated-declarations]
16 | traits.set_supports_two_point_target_temperature(false);
| ~~~~~~~~~~~~~~~~~~~~~~~~~~~~~~~~~~~~~~~~~~~~~~~~^~~~~~~
src/esphome/components/climate/climate_traits.h:108:8: note: declared here
108 | void set_supports_two_point_target_temperature(bool supports_two_point_target_temperature) {
| ^~~~~~~~~~~~~~~~~~~~~~~~~~~~~~~~~~~~~~~~~
src/esphome/components/panasonic_ac/panasonic_ac_base.cpp: In member function ‘void esphome::panasonic_ac::PanasonicACBase::update_swing_horizontal(const std::string&)’:
src/esphome/components/panasonic_ac/panasonic_ac_base.cpp:102:39: warning: ‘esphome::select::Select::state’ is deprecated: Use current_option() instead of .state. Will be removed in 2026.5.0 [-Wdeprecated-declarations]
102 | this->horizontal_swing_select_->state != this->horizontal_swing_state_) {
| ^~~~~
In file included from src/esphome/components/panasonic_ac/panasonic_ac_base.h:4:
src/esphome/components/select/select.h:39:15: note: declared here
39 | std::string state{};
| ^~~~~
src/esphome/components/panasonic_ac/panasonic_ac_base.cpp:102:39: warning: ‘esphome::select::Select::state’ is deprecated: Use current_option() instead of .state. Will be removed in 2026.5.0 [-Wdeprecated-declarations]
102 | this->horizontal_swing_select_->state != this->horizontal_swing_state_) {
| ^~~~~
src/esphome/components/select/select.h:39:15: note: declared here
39 | std::string state{};
| ^~~~~
src/esphome/components/panasonic_ac/panasonic_ac_base.cpp: In member function ‘void esphome::panasonic_ac::PanasonicACBase::update_swing_vertical(const std::string&)’:
src/esphome/components/panasonic_ac/panasonic_ac_base.cpp:111:37: warning: ‘esphome::select::Select::state’ is deprecated: Use current_option() instead of .state. Will be removed in 2026.5.0 [-Wdeprecated-declarations]
111 | this->vertical_swing_select_->state != this->vertical_swing_state_) {
| ^~~~~
src/esphome/components/select/select.h:39:15: note: declared here
39 | std::string state{};
| ^~~~~
Compiling .pioenvs/test1-ac/src/esphome/components/restart/switch/restart_switch.cpp.o
src/esphome/components/panasonic_ac/panasonic_ac_component.cpp: In member function ‘virtual void esphome::panasonic_ac::PanasonicAC::control(const esphome::climate::ClimateCall&)’:
src/esphome/components/panasonic_ac/panasonic_ac_component.cpp:112:34: error: request for member ‘has_value’ in ‘(& call)->esphome::climate::ClimateCall::get_custom_fan_mode()’, which is of non-class type ‘const char*’
112 | if (call.get_custom_fan_mode().has_value()) {
| ^~~~~~~~~
src/esphome/components/panasonic_ac/panasonic_ac_component.cpp:115:27: error: conversion from ‘const char’ to non-scalar type ‘std::string’ {aka ‘std::__cxx11::basic_string<char>’} requested
115 | std::string fanMode = *call.get_custom_fan_mode();
| ^~~~~~~~~~~~~~~~~~~~~~~~~~~
src/esphome/components/panasonic_ac/panasonic_ac_component.cpp:166:32: error: request for member ‘has_value’ in ‘(& call)->esphome::climate::ClimateCall::get_custom_preset()’, which is of non-class type ‘const char*’
166 | if (call.get_custom_preset().has_value()) {
| ^~~~~~~~~
src/esphome/components/panasonic_ac/panasonic_ac_component.cpp:169:26: error: conversion from ‘const char’ to non-scalar type ‘std::string’ {aka ‘std::__cxx11::basic_string<char>’} requested
169 | std::string preset = *call.get_custom_preset();
| ^~~~~~~~~~~~~~~~~~~~~~~~~
src/esphome/components/panasonic_ac/panasonic_ac_component.cpp: In member function ‘void esphome::panasonic_ac::PanasonicAC::handle_packet()’:
src/esphome/components/panasonic_ac/panasonic_ac_component.cpp:461:11: error: ‘class esphome::panasonic_ac::PanasonicAC’ has no member named ‘custom_fan_mode’; did you mean ‘const char* esphome::climate::Climate::custom_fan_mode_’? (accessible via ‘const char* esphome::climate::Climate::get_custom_fan_mode() const’)
461 | this->custom_fan_mode = determine_fan_speed(this->rx_buffer_[26]);
| ^~~~~~~~~~~~~~~
| get_custom_fan_mode()
src/esphome/components/panasonic_ac/panasonic_ac_component.cpp:462:11: error: ‘class esphome::panasonic_ac::PanasonicAC’ has no member named ‘custom_preset’; did you mean ‘const char* esphome::climate::Climate::custom_preset_’? (accessible via ‘const char* esphome::climate::Climate::get_custom_preset() const’)
462 | this->custom_preset = determine_preset(this->rx_buffer_[42]);
| ^~~~~~~~~~~~~
| get_custom_preset()
src/esphome/components/panasonic_ac/panasonic_ac_component.cpp:522:17: error: ‘class esphome::panasonic_ac::PanasonicAC’ has no member named ‘custom_fan_mode’; did you mean ‘const char* esphome::climate::Climate::custom_fan_mode_’? (accessible via ‘const char* esphome::climate::Climate::get_custom_fan_mode() const’)
522 | this->custom_fan_mode = determine_fan_speed(this->rx_buffer_[currentIndex + 2]);
| ^~~~~~~~~~~~~~~
| get_custom_fan_mode()
src/esphome/components/panasonic_ac/panasonic_ac_component.cpp:526:17: error: ‘class esphome::panasonic_ac::PanasonicAC’ has no member named ‘custom_preset’; did you mean ‘const char* esphome::climate::Climate::custom_preset_’? (accessible via ‘const char* esphome::climate::Climate::get_custom_preset() const’)
526 | this->custom_preset = determine_preset(this->rx_buffer_[currentIndex + 2]);
| ^~~~~~~~~~~~~
| get_custom_preset()
*** [.pioenvs/test1-ac/src/esphome/components/panasonic_ac/panasonic_ac_component.cpp.o] Error 1
Hi,
I am considering if trying this approach rather than hacking the remote 🙂 So I wonder how the mother board connects to the built-in wifi module and to the 5 pins connector. The latter looks like a UART, but it could be that the mother board listens to two different peripherals. I got the service manual but I can’t find these details there.
Reason I ask is that I want to understand if I need to take out the built-in WIFI module before attaching the ESP32 adapter board to the 5 pins connector, or if the two modules can coexist, just to avoid demounting the grill and fiddling with inner parts.
Also, I wonder if the communication protocol is of public domain, if you don’t mind to share.
Thanks,
Franco
Hi building a couple of these boards for my Air con’s. Where does the DS18B20 get mounted on the aircon? any pics of installs?
It’s pretty useless as the unit does nothing with this temperature. It’s only to have another sensor in Home Assistant (and what good does that do?). Most people mount it away from the aico, not IN the airco to have a better room temperature reading.
Ok good to know. I don’t need it then as I have zigbee room temp and humidity sensor at the far side of the room
Not sure if this is a deliberate omission, but it seems that there is no connection to a GPIO from the 4.7k resistor to the ESP32 in the Circuit board on PCBway
Hi, I’ve made a couple, but all have the same issue, they come online but only give me this error:
12:57:18.045][W][panasonic_ac.cz_tacg1:433]: Dropping invalid packet (length)
any suggestions?
same problem, look here:
https://github.com/DomiStyle/esphome-panasonic-ac/issues/147
Thank you for mentioning this. Mine does function, only stating the error above. The mentioned github issue states that it works for a couple of minutes before they need to reset and offers no fix. Anyone has any other suggestions?
Hi
Is there any way to buy pre-assembled version of ESP32-powered board for Panasonic AC?
I am also all for DIY, but I am really bad at soldering, so I would pay extra to someone who knows how to do it properly and I better focus on the software itself (I am trying to make it work with the professional series of Panasonic ACs that are work with CZ-CAPWFC1
Thanks
Hello, my Panasonic CS-TZ25ZKEW has a free available port which looks like 5-pin CN-CNT. Can I safely connect this module into the port, even if the unit already has wifi? I mean, the port is empty, so the wifi module must be hidden somewhere inside the unit, as it came from the factory, because the wifi and Panasonic cloud normally works with the 5-pin connector empty. Photo attached. Thank you very much for a response!
Yes, you can.